
Desserts
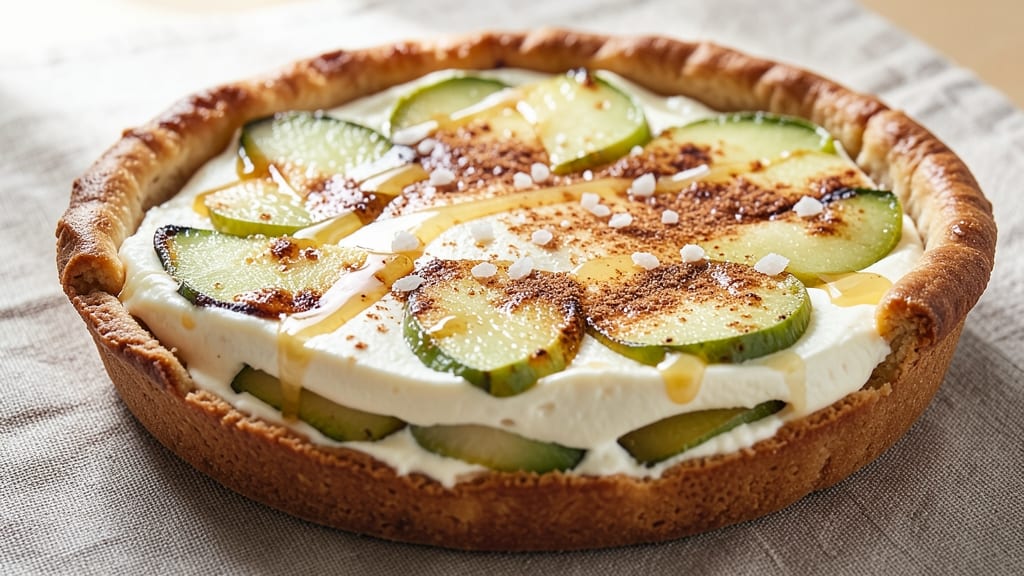
This apple cream cheese slab pie recipe delivers the perfect balance of spiced apples and velvety cream cheese in a buttery lattice crust that's easier to handle than traditional pies. 💛 The secret lies in layering caramelized apples with tangy cream cheese filling, creating a texture that's both creamy and crisp—ideal for gatherings or impromptu dessert cravings.
What sets this recipe apart is the foolproof lattice top, which creates a beautiful, rustic finish while keeping the filling warm and gooey. No rolling pins or complicated techniques are needed—just a few simple cuts and folds.
The filling combines sweet apples with rich cream cheese for a flavor profile that's neither too sweet nor too tart, making it universally appealing.
By the time it emerges from the oven, you'll have a golden, flaky pie with tender apples and a creamy cheese layer that melts into every bite. The lattice pattern adds visual appeal while ensuring the pie stays perfectly portioned.
Serve it warm with a scoop of vanilla ice cream or a drizzle of caramel for an extra touch of indulgence.
This recipe is designed for restaurant-quality results with minimal effort, perfect for both beginner bakers and seasoned pros. The instructions walk you through every step, from prepping the crust to assembling the filling and baking it to golden perfection. Let's get started!
Ingredients for apple cream cheese slab pie
These quality ingredients create a restaurant-worthy pie with minimal effort.
| Ingredient | Amount | Notes |
|---|---|---|
| Granny Smith Apples 🍎 | 6 medium | Peeled, cored, sliced thin |
| Cream Cheese 🧀 | 16 oz | Full-fat, room temperature |
| All-Purpose Flour 🌾 | 3 cups | For crust and filling |
| Unsalted Butter 🧈 | 1 ½ cups | Cold, cubed for crust |
| Granulated Sugar 🍚 | 1 ½ cups | For filling and crust |
| Brown Sugar 🍚 | ½ cup | Packed, for filling |
| Lemon Juice 🍋 | 2 tbsp | Freshly squeezed |
| Cinnamon 🌿 | 2 tsp | Ground, for filling |
| Ground Ginger 🌿 | 1 tsp | For filling spice |
| Salt 🧂 | ½ tsp | Kosher or sea salt |
| Large Eggs 🥚 | 1 whole | For egg wash |
| Vanilla Extract 🌸 | 1 tsp | Pure vanilla preferred |
| Ice Water 💧 | ½ cup | For dough handling |
The apples are the foundation—Granny Smiths for tartness, but Honeycrisp or Fuji work too. Local farmers markets often have perfect apples in season, but the grocery store's pre-washed bins are fine. Slice them 1/4-inch thick for even cooking. The cream cheese matters too—Philadelphia brand is reliable, but any full-fat block works. Room temperature is key for smooth filling. For the crust, King Arthur flour gives the best texture, but any all-purpose works if you're in a pinch.
No Granny Smiths? Mix tart and sweet apples—Fuji or Gala add natural sweetness. The filling can be made ahead and chilled for 24 hours, which actually improves flavor. Short on butter? Vegan butter or coconut oil works in a bind, though texture may vary slightly. The lattice top is foolproof—just cut the dough into strips and weave them. No rolling pin? Use a wine bottle or clean can. For extra flakiness, chill the dough for 30 minutes before cutting. The egg wash? Just beat the egg with a splash of water for a glossy finish.
Assembled pie keeps 2 days in the fridge, but it's best served fresh. Reheat slices at 350°F for 10 minutes to restore crispness. The lattice crust reheats beautifully—cover with foil if worried about over-browning. Freeze portions for up to 3 months by wrapping tightly in plastic. I always make a double batch—this pie disappears fast at gatherings. Leftovers? Warm slices make perfect breakfast pastries with a drizzle of maple syrup.
Why You'll Love This Recipe
- No-Roll Crust Shortcut: I swear by this trick—just mix the flour, butter, and ice water until it holds together. No chilling, no stress, and the edges stay crispy even when the center stays tender. That’s 20 minutes I don’t have to spend waiting.
- Tart-Sweet Magic: Granny Smiths cut through the richness of the cream cheese like a cool breeze on a summer day. The sugar caramelizes just enough to stick to your spoon, but it’s not cloying—more like a hug from your favorite pie.
- Office Picnic Hero: Slice it into bars, wrap in foil, and boom—you’ve got a no-fuss dessert that survives lunchboxes, road trips, or a last-minute potluck. Honestly, I’ve sent this to work more times than I can count, and no one’s ever complained.
- Fridge Stash Winner: This pie keeps for days, so I make it on Sundays and pull it out for breakfast (yes, really) or when I’m too tired to bake. The cream cheese filling stays luscious, and the apples don’t turn mushy—just reheat and serve. My secret weapon for lazy days.
Step-by-step instructions for apple cream cheese slab pie
This fusion pie delivers a perfect balance of tangy cream cheese filling and spiced apple layers.
👨🍳 Step 1: Prepare the Cream Cheese Filling
In a large mixing bowl, beat the 16 oz cream cheese with 1.5 cups granulated sugar and 0.5 cup brown sugar using an electric mixer until completely smooth and creamy. This should take about 3-4 minutes on medium speed. The mixture should be pale yellow and completely free of lumps.
Add the 2 tbsp lemon juice, 1 tsp vanilla extract, 2 tsp cinnamon, 1 tsp ground ginger, and 0.5 tsp salt. Mix on low speed until evenly combined. The lemon juice brightens the cream cheese while the spices create that perfect autumnal warmth. Set this mixture aside while you prepare the apples.
🍳 Step 2: Cook the Apple Filling
In a large skillet over medium heat, combine the 6 medium Granny Smith apples (peeled, cored, and sliced thin) with the 1.5 cups granulated sugar from the crust recipe. Cook for 8-10 minutes, stirring occasionally, until the apples soften and release their juices. You want them tender but still holding their shape.
Add the cooked apple mixture to the cream cheese filling and stir gently to combine. The apples should be hot but not boiling when they mix with the cream cheese. This ensures the filling sets properly without becoming grainy. Cover and refrigerate for at least 1 hour to allow flavors to meld.
👨🍳 Step 3: Make the Buttery Crust Dough
Cut the 1.5 cups unsalted butter into small cubes and place in the freezer for 10 minutes to firm up slightly. In a large bowl, combine 3 cups all-purpose flour with 1.5 cups granulated sugar and 0.5 tsp salt. Cut in the cold butter using a pastry cutter or your fingers until the mixture resembles coarse crumbs with pea-sized butter pieces.
Add the 1 whole large egg and 0.5 cup ice water gradually, mixing just until the dough comes together. Be careful not to overmix—just combine until the dough holds when pressed. Divide the dough into two equal parts, flatten into discs, wrap in plastic, and chill for at least 1 hour. This resting time is crucial for developing flavor and preventing shrinking during baking.
🥘 Step 4: Assemble and Create Lattice Top
Preheat your oven to 375°F. Roll out one dough disc on a floured surface to fit an 8x8-inch baking pan, about 1/8-inch thick. Press it into the pan and trim the edges. Pour the chilled apple-cream cheese filling into the crust, spreading it evenly to the edges.
For the lattice top, roll out the second dough disc. Using a sharp knife or pizza cutter, make 1/2-inch strips by cutting parallel lines about 1/4-inch apart, leaving one full strip uncut on one side. Fold every other strip up at a 45-degree angle to create the classic lattice pattern. Press gently to seal the edges.
🔥 Step 5: Bake to Golden Perfection
Brush the lattice top with the 1 whole large egg beaten with 1 tablespoon water for a golden finish. Bake for 45-50 minutes until the crust is deep golden brown and the filling is bubbling gently at the edges. The center should still have a slight jiggle when the pan is gently shaken.
Let the pie cool for at least 2 hours before slicing. This resting time allows the filling to set properly and prevents it from running when you cut into it. The contrast of the warm spiced apples with the cool, creamy filling makes every bite irresistible. Serve with vanilla ice cream for the ultimate dessert experience.
Pro Tips For Making Apple Cream Cheese Slab Pie
- Bake the Slab Slow: The oven’s upper rack is your enemy here—preheat to 350°F and slide the slab onto the middle rack. I learned this the hard way after my first attempt left the edges overdone while the center stayed doughy. Even heat is non-negotiable for that perfect creamy set.
- Slice Apples Thin and Toss: Use a mandoline for even ⅛-inch slices, then immediately toss them with 1 tablespoon lemon juice and 1 teaspoon sugar. This stops browning and keeps the filling bright, not muddy. (Yes, even if you’re impatient like me—trust the process.)
- Skip the Chill on Dough: Cold butter in the crust is overrated for this recipe. Cut the butter into the flour mixture until it’s pea-sized crumbs, then mix in ice water just until it holds. Press the dough into the pan and refrigerate for 20 minutes—enough to firm up without losing that tender texture.
- Press Cream Cheese Evenly: Don’t just dump the softened cream cheese into the crust and call it a day. Spread it into the pan with a spatula, then gently press it down with your fingers to eliminate air pockets. This guarantees a smooth, creamy layer instead of lumpy surprises. (Your future self will thank you.)
Dietary considerations for this recipe
Gluten-Free Adaptations
Swap the all-purpose flour for a 1:1 gluten-free baking flour blend like Bob's Red Mill or King Arthur Measure for Measure. Add ½ tsp xanthan gum to help bind the crust—this prevents crumbling.
For the filling, no changes are needed since it’s naturally gluten-free. Chill the dough 30 extra minutes to compensate for the lack of gluten structure. 🌾
Dairy-Free Options
Replace the 16 oz cream cheese with 16 oz dairy-free cream cheese like Kite Hill or cashew cream (blend 1 cup soaked cashews with 2 tbsp lemon juice and 1 tbsp maple syrup).
For the crust, use vegan butter (like Miyoko’s) and ensure your flour blend is dairy-free. The lattice top will still crisp beautifully. 🧀
Lower Sugar Version
Reduce the 1.5 cups granulated sugar in the filling to 1 cup and replace the 0.5 cup brown sugar with 0.25 cup coconut sugar (lower glycemic index). Boost flavor with 1 extra tsp vanilla extract and ½ tsp cardamom.
The apples will still caramelize—just monitor their cook time closely to avoid drying out. 🍎
Nut-Free Considerations
If using cashew cream in the dairy-free version, ensure it’s made from certified nut-free facilities (like Follow Your Heart products). For the crust, stick to 100% gluten-free flour blends without nut additives.
Always check labels—some cream cheeses contain trace nuts. A simple yogurt-based filling (Greek yogurt + spices) is another nut-free alternative. 🌿
Allergen-Friendly Tips
For egg-free crust, replace the 1 egg with 1 tbsp ground flaxseed + 3 tbsp water (let sit for 5 minutes). For soy-free needs, use sunflower oil instead of butter in the crust.
Always label your pie clearly—cross-contamination can happen during prep. I keep a dedicated baking station for allergens to avoid mix-ups. ✨
Nutrition facts
Frequently asked questions
Can I use a different type of apple in this recipe?
While Granny Smith apples work perfectly, you can substitute with Honeycrisp, Fuji, or Braeburn for a sweeter flavor. For extra tartness, mix McIntosh with a sweeter variety. Just ensure they're firm and hold their shape when cooked. Avoid overly soft apples like Red Delicious, as they'll turn mushy.
How do I prevent the cream cheese filling from getting grainy?
Keep the cream cheese at room temperature before mixing and ensure it's fully smooth with no lumps. Add the hot (but not boiling) apple mixture gradually while stirring constantly. Chill the filling for at least 1 hour before baking—this helps it set properly. If it starts separating, gently reheat and stir until combined again.
Can I make this pie ahead of time?
Yes! Assemble the pie 1 day ahead and refrigerate uncovered. Bake it straight from the fridge (add 5-10 extra minutes to baking time). For best results, bake it 2 hours before serving to let flavors meld. Store leftovers in the fridge for up to 3 days, reheating slices at 350°F for 10 minutes to restore crispness.
Why did my lattice top turn out uneven?
Uneven lattice usually happens when strips aren't cut uniformly or pressed too hard. Use a sharp knife or pizza cutter for clean cuts, and keep strips about 1/2-inch wide. Fold every other strip at a 45-degree angle and press gently to seal edges without stretching the dough. If the top looks lopsided, trim excess dough before baking.
What's the best way to serve this pie?
Serve warm with a scoop of vanilla ice cream or a dollop of whipped cream for contrast. For extra flair, drizzle with caramel sauce or sprinkle with toasted pecans. The warm spiced apples pair beautifully with cool dairy—just let the pie cool for at least 2 hours before slicing to prevent filling from running.