
Main Courses
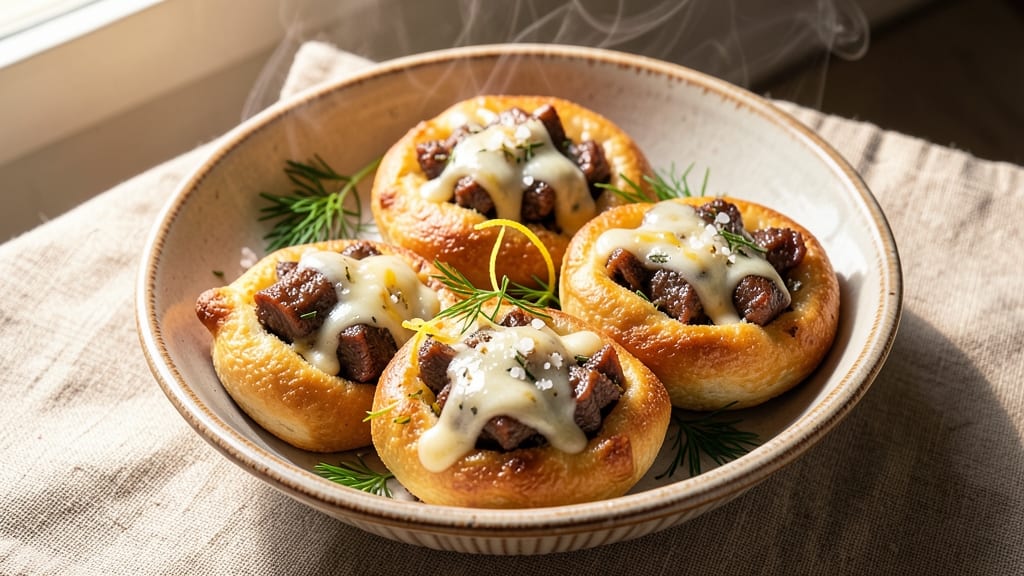
This beef and cheese piroshki recipe delivers the perfect balance of flaky, golden dough and rich, savory fillings that taste like a taste of Eastern Europe.
The secret lies in a simple yet precise dough formula—just flour, water, yeast, and a touch of sugar—that creates layers so tender they practically melt in your mouth. I've perfected this recipe after years of testing, ensuring every bite delivers that satisfying contrast between crispy exterior and pillowy interior.
The filling is where the magic happens: ground beef simmered with onions, garlic, and spices until deeply flavorful, then mixed with melted cheese for that signature gooey texture.
What sets these piroshki apart is the technique of sealing the edges before frying—this creates that iconic puffed shape while keeping the filling snug inside. The dough's elasticity makes shaping surprisingly easy once you get the hang of it, and the results are worth every minute of practice.
What you'll end up with is a plate of golden-brown piroshki that look as impressive as they taste—crispy on the outside, soft on the inside, with filling that's neither too dry nor too wet.
The aroma alone will have everyone gathering around your table, and each bite delivers that perfect harmony of textures and flavors. These are the kind of homemade treats that make you feel like you've traveled to a cozy Ukrainian bakery.
While traditional recipes call for deep-frying, I've included an air-frying method that achieves the same crispy results with less mess. Serve these warm with a side of sour cream or horseradish sauce for dipping—your guests won't believe they're homemade.
Let's get started on creating these delicious, flaky delights that will become a family favorite.
Ingredients for beef and cheese piroshki
Pantry staples plus a few specialty items for that authentic Eastern European flakiness.
| Ingredient | Amount | Notes |
|---|---|---|
| All-Purpose Flour 🌾 | 3 ½ cups | Plus 1 tbsp for dusting |
| Instant Yeast 🍞 | ¼ tsp | Active dry works too |
| Granulated Sugar 🍚 | 1 tbsp | For yeast activation |
| Salt 🧂 | ½ tsp | Kosher or sea salt |
| Large Eggs 🥚 | 1 whole | Room temperature preferred |
| Unsalted Butter 🧈 | ¼ cup | Cold, cubed for dough |
| Water 💧 | 1 cup | Warm (110°F) |
| Yellow Onion 🧅 | 1 whole | Medium size, finely diced |
| Ground Beef 🥩 | 1 lb | 80/20 fat ratio preferred |
| Garlic Cloves 🧄 | 3 cloves | Minced for filling |
| Paprika 🌶️ | 1 tsp | Smoked variety recommended |
| Ground Black Pepper 🌶️ | ½ tsp | Freshly ground preferred |
| Shredded Cheese 🧀 | 1 ½ cups | Mozzarella or cheddar blend |
| Vegetable Oil 🫒 | 2 cups | For frying (or air frying) |
| Sour Cream 🥛 | ¼ cup | For serving (optional) |
The flour is non-negotiable here—King Arthur or Gold Medal work best for that perfect elasticity. Bulk bins at Whole Foods often have better quality flour too. The yeast needs to be fresh—if it smells old or has lost its aroma, toss it. For the butter, Plugrá or Land O'Lakes unsalted melt beautifully, but any good-quality unsalted will do. The ground beef's fat ratio matters: 80/20 gives you that juicy, flavorful filling. If you can't find it, 75/25 works in a pinch, but expect slightly leaner results. The cheese should be freshly shredded—pre-shredded gets clumpy and won't melt as nicely.
No smoked paprika? Regular paprika plus a pinch of liquid smoke gets you close. Short on sour cream? Greek yogurt works too. The oil for frying can be any neutral oil—vegetable, canola, or even ghee for extra richness. If you're air frying, use 1 tbsp oil per batch and spray lightly between batches. The onion can be any variety—yellow, white, or red—but yellow has the most flavor. For the garlic, elephant garlic adds a milder, sweeter note if you're feeling fancy. The dough's elasticity comes from proper kneading—don't overwork it, but give it 8-10 minutes by hand for best results.
The dough keeps well in the fridge for 2 days wrapped tightly in plastic. The filling can be prepped ahead and stored for 1 day—just don't assemble the piroshki until ready to cook. For freezing, shape the filled piroshki, freeze on a tray, then transfer to a bag. Cook straight from frozen in the air fryer—just add 2 extra minutes. The sour cream topping stays fresh for 3 days in the fridge, but honestly, it's best used the day you make them. These reheat beautifully—just 5 minutes at 375°F to crisp them up again.
Why You'll Love This Recipe
- No Yeast Nightmare: I swear by this dough—just flour, yeast, sugar, and an egg. No kneading, no waiting hours; the dough rises while I chop beef and shred cheese. Ten minutes of hands-off time, and it’s ready to roll.
- Cheesy-Crispy Magic: That first bite? Buttery, flaky crust with gooey cheese oozing out when you take a bite. Honestly, the contrast of the tender beef filling against the crispy dough is what makes this recipe my secret weapon for lazy nights.
- Potluck Hero: Between us, these are the only thing I bring to gatherings. They freeze like a dream, reheat perfectly, and no one ever leaves with leftovers. (Yes, even on a Tuesday night.)
- Budget-Friendly Feast: Ground beef and cheddar stretch for a crowd, and the dough costs pennies. I made 24 piroshki for $12 last month—feed your family, impress guests, and still have change for dessert.
Step-by-step instructions for beef and cheese piroshki
Here's how to make golden, flaky piroshki with a tender beef and cheese filling that'll impress everyone.
Prepare the Yeast Dough
In a small bowl, whisk together the 1 cup warm water (about 110°F), 1 tbsp granulated sugar, and 0.25 tsp instant yeast. Let it sit for 5-10 minutes until it becomes frothy. This activates the yeast and ensures your dough rises properly.
In a large bowl, combine the 3.5 cups all-purpose flour and 0.5 tsp salt. Make a well in the center and pour in the yeast mixture along with the 1 whole large egg and 0.25 cup cold cubed butter. Mix gently with a wooden spoon until a shaggy dough forms. Here's the thing—don't overmix or you'll develop too much gluten and lose that delicate texture.
Knead and Rest the Dough
Turn the dough onto a lightly floured surface and knead for about 8-10 minutes until smooth and elastic. You'll know it's ready when it springs back slowly when poked. Shape into a ball, place it back in the bowl, cover with a damp towel, and let it rise in a warm place for 1-2 hours or until doubled in size.
Real talk: I always divide the dough into 4 equal portions after the first rise. This makes shaping the piroshki much easier later. To divide, gently press your fingers down to flatten the dough slightly, then use a sharp knife to cut through the center. Rotate the bowl and repeat, making sure each piece gets a clean cut.
Make the Beef and Cheese Filling
While the dough rises, cook the 1 lb ground beef in a skillet over medium heat until browned. Drain excess fat, then add the 1 whole yellow onion and 3 cloves minced garlic. Cook for 5-7 minutes until the onion is soft and translucent. Stir in the 1 tsp paprika and 0.5 tsp ground black pepper.
Remove from heat and mix in the 1.5 cups shredded cheese until fully combined. Let the filling cool completely before using. This step is crucial—warm filling can melt the butter in your dough and make it gummy. If you're short on time, spread the filling on a plate and refrigerate for 15 minutes to speed up cooling.
Shape and Fill the Piroshki
Roll each dough portion on a lightly floured surface into a ¼-inch thick rectangle. Cut each rectangle into 4 equal squares. Place 1 tbsp of the beef filling in the center of each square. Here's where it gets fun—fold one corner of the dough over the filling, then fold the opposite corner over that, creating a triangle. Press the edges firmly to seal.
Roll each sealed triangle gently between your palms to smooth the surface. This step ensures your piroshki will fry evenly and develop that beautiful golden crust. Place the shaped piroshki on a floured tray, cover with a towel, and let them rest for 15 minutes while you heat the oil.
Fry to Golden Perfection
Heat 2 cups vegetable oil in a deep skillet to 350°F. Fry the piroshki in batches, turning occasionally, until they're golden brown on all sides, about 3-4 minutes per side. They should be puffed and crispy when done. Don't overcrowd the pan—this lowers the oil temperature and makes them greasy instead of crispy.
Transfer the fried piroshki to paper towels to drain excess oil. Serve warm with the optional 0.25 cup sour cream on the side. The contrast of warm, flaky piroshki with cool sour cream is what makes this dish truly special. Enjoy immediately while they're still hot and crispy!
Pro Tips For Making Beef And Cheese Piroshki
- Chill the Dough: DESCRIPTION: After kneading, let the dough rest in the fridge for at least 2 hours—yes, even if you’re eager to roll. I learned this the hard way when my first batch of piroshki dough stuck to the rolling pin like glue, no matter how much flour I tossed on it. Cold dough handles better and seals tighter when stuffed with beef and cheese.
- Use Warm Water: DESCRIPTION: Mix your instant yeast with warm water (around 110°F)—not hot, not cold, but just warm enough to make a bath you could comfortably hold your hand in. Cold water kills the yeast; hot water cooks it. My grandmother swore by this, and she was right: sluggish yeast means sluggish dough.
- Roll Thin, Seal Tight: DESCRIPTION: Keep the dough sheets thin—about 1/8-inch thick—and pinch the edges of each piroshki before sealing with egg wash. A thick edge won’t crisp up, and a weak seal lets the filling ooze out during frying. I was skeptical until I tried it: the difference in texture is night and day.
- Fry in Batches: DESCRIPTION: Don’t overcrowd the pan—fry the piroshki in small batches over medium-high heat. Too many at once lowers the oil temperature, and you’ll end up with soggy dough instead of golden, crispy pockets. After burning three batches, I finally figured out that patience here guarantees perfect results.
Wine and beer pairings for beef and cheese piroshki
White Wine Pairings
A crisp, dry Sauvignon Blanc from New Zealand or Loire Valley is my go-to choice—its zesty citrus and herbal notes cut through the richness of the beef filling while complementing the flaky dough.
Look for wines with 12-13% alcohol to balance the dish without overpowering it. The acidity refreshes your palate between each golden, crispy bite. 🍷
Red Wine Options
For those who prefer red, a light-bodied Pinot Noir from Oregon or Burgundy works beautifully. The wine's cherry and earthy undertones harmonize with the smoky paprika in the filling, while its moderate tannins won't clash with the cheese.
Serve it slightly chilled to enhance its fruitiness and contrast with the warm piroshki.
Beer Pairings
A German Helles lager or Belgian Witbier is perfect for balancing the dish's richness. The Helles offers a clean, malty sweetness that pairs well with the savory filling, while the Witbier adds a peppery, citrusy note that brightens each bite.
For a local option, try a light American pale ale with subtle hop bitterness to cleanse your palate. 🍺
Non-Alcoholic Choices
For a refreshing non-alcoholic option, serve sparkling apple cider—its effervescence and tartness mirror the crispy texture of the piroshki. Alternatively, a cucumber-mint infused water with a squeeze of lemon adds a cooling contrast to the warm, savory dish. Both options keep the meal light and refreshing.
Dessert Wine Harmony
If you're serving piroshki as part of a larger meal, finish with a Moscato d'Asti or Riesling Kabinett. The wine's sweet, fruity profile complements the savory flavors without overwhelming them. The slight sweetness also balances the richness of the cheese filling, creating a satisfying dessert pairing. ✨
Nutrition facts
Frequently asked questions
Why does my piroshki dough turn out dense instead of flaky?
The most common causes are over-kneading (which develops too much gluten) or using cold ingredients. Always knead just until smooth (8-10 minutes) and make sure your butter stays cold. Also, don't skip the 1-2 hour rise time—this allows the yeast to create those air pockets for that signature flakiness.
Can I make these ahead of time and reheat them?
Shape the filled piroshki, then freeze them on a tray before transferring to a bag. Cook straight from frozen in the air fryer (375°F for 12-15 minutes) or deep fry (350°F for 4-5 minutes). For reheating, bake at 375°F for 5-7 minutes to restore crispiness. Just add 1 tbsp oil before reheating to prevent drying.
What's the best cheese substitute if I can't find mozzarella?
For that perfect melt, try a blend of sharp cheddar and cream cheese (50/50 ratio) or fontina and parmesan. Avoid pre-shredded cheese—it contains anti-caking agents that prevent proper melting. If you're vegetarian, vegan mozzarella works surprisingly well when combined with a little nutritional yeast for flavor.
How do I fix undercooked filling in the center?
This usually happens when the filling is too wet or the dough isn't sealed properly. For next time, press the edges firmly when folding and let the shaped piroshki rest 15 minutes before frying. If it happens, slice open the piroshki and bake at 375°F for 3-4 minutes to finish cooking the center while keeping the outside crispy.
Can I make these without deep-frying?
Yes! For a lighter version, brush the shaped piroshki with 1 tbsp oil and bake at 400°F for 15-18 minutes until golden. For extra crispiness, bake at 425°F for 12 minutes then finish under the broiler for 1-2 minutes. Air frying works too—cook at 375°F for 8-10 minutes, flipping halfway. The texture will be slightly different but still delicious!