
Main Courses
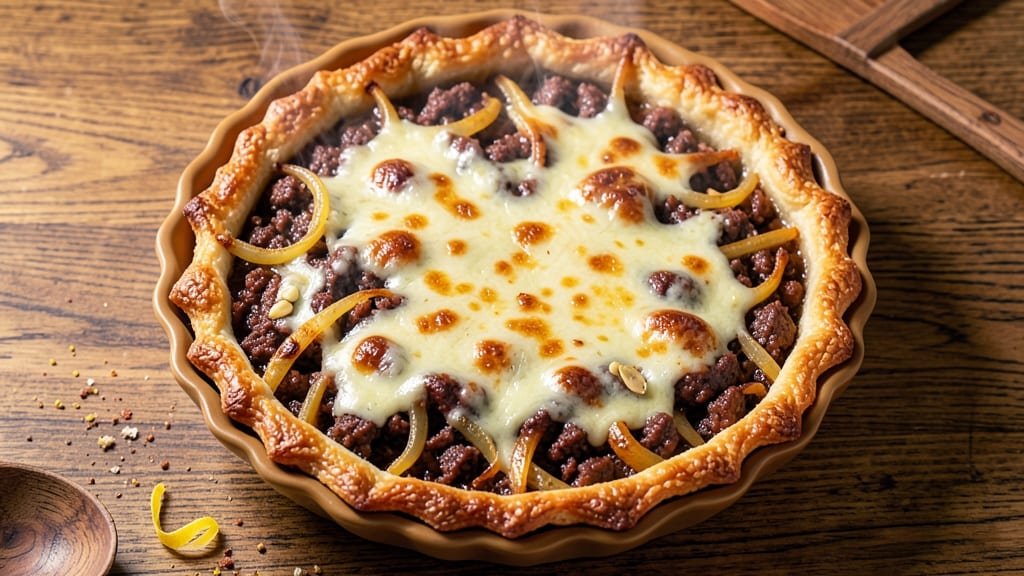
This beef and cheese pie recipe delivers flaky golden crusts that perfectly encase a rich, savory filling of tender beef and melted cheese. The secret lies in a well-seasoned ground beef mixture that transforms into a hearty, comforting centerpiece—ideal for family dinners or holiday gatherings.
With a simple yet impressive technique, you’ll achieve restaurant-quality results without advanced skills.
The recipe begins with a foolproof pie crust that’s rolled out and filled with a savory mixture of ground beef, onions, garlic, and a blend of cheeses that melts into a velvety finish.
The filling is seasoned just right—herbs, Worcestershire sauce, and a touch of mustard create depth without overpowering the beef. Baking at the right temperature ensures the crust stays crisp while the filling remains tender and bubbly.
What makes this recipe stand out is how the flaky crust hugs every bite, delivering a perfect balance of textures—crisp edges, tender filling, and a golden-brown top that’s impossible to resist.
The aroma alone will have everyone anticipating dinner, and the first bite delivers on that promise with every savory, cheesy, and herby note.
Serve these pies with a simple green salad or steamed vegetables to round out the meal. The combination of rich, hearty filling and buttery crust makes this dish a crowd-pleaser, perfect for any occasion where you want to impress without spending hours in the kitchen. Let’s get started!
Ingredients for beef and cheese pie
Six ingredients for the crust, ten for the filling—simple yet impressive for hearty beef and cheese pies.
| Ingredient | Amount | Notes |
|---|---|---|
| All-Purpose Flour 🌾 | 4 cups | For pie crust, sifted |
| Unsalted Butter 🧈 | 1 ½ cups | Cold, cubed for crust |
| Ice Water 💧 | ½ cup | For pie dough binding |
| Ground Beef 🥩 | 1 ½ lb | 80/20 fat ratio preferred |
| Yellow Onion 🧅 | 1 whole | Diced, about 1 cup |
| Garlic Cloves 🧄 | 4 cloves | Minced for filling |
| Shredded Sharp Cheddar Cheese 🧀 | 2 cups | Freshly grated preferred |
| Shredded Mozzarella Cheese 🧀 | 1 cup | Part-skim for balance |
| Worcestershire Sauce 🍶 | 1 tbsp | For depth of flavor |
| Dijon Mustard 🍯 | 1 tbsp | Adds tangy balance |
| Dried Thyme 🌿 | 1 tsp | Or 1 tbsp fresh thyme |
| Salt 🧂 | 1 tsp | Kosher or sea salt |
| Ground Black Pepper 🌶️ | ½ tsp | Freshly ground preferred |
| Heavy Cream 🥛 | ¼ cup | For creamy filling |
| Egg 🥚 | 1 whole | For egg wash |
The flaky crust starts with cold butter and flour. Use Arctic Core butter from the frozen section—it stays firm longer. Most grocery stores carry it, or check the baking aisle. For the beef, 80/20 fat ratio is key—it keeps the filling juicy. Pre-grated cheese? Toss it. It gets clumpy. Shred your own using the large holes on a box grater. The sharp cheddar should be vibrant orange, not yellow or waxy.
No Worcestershire? Soy sauce plus a pinch of sugar works in a pinch. Fresh thyme is ideal, but dried at one-third the amount gets you close. The heavy cream can be swapped for half-and-half, though it’ll be slightly lighter. For the crust, no short cuts—chill the dough between rolls, or it’ll shrink. If you don’t have a pie dish, 6-inch muffin tins work for individual pies. Just reduce the filling to 1 tbsp per cup.
The crust dough keeps 2 days wrapped in plastic in the fridge. The filling can be prepped ahead and refrigerated 24 hours before baking—flavors meld beautifully. For make-ahead pies, bake the crusts empty, then fill and bake again. They reheat perfectly—350°F for 10 minutes revives the crisp. Store leftovers in an airtight container for 4 days or freeze for 3 months.
Why You'll Love This Recipe
- One-Bowl Wonder: I swear by this recipe when I’m too tired to measure three separate things—just toss the flour, butter, and ice water in one bowl, mix until it holds, and roll it out. No food processor, no fuss, no stress.
- Savory Crust, Rich Filling: That golden, buttery crust paired with tender ground beef and melted cheese? It’s the kind of combo that makes you pause mid-bite. Honestly, the onion caramelizes just enough to add sweetness without overpowering the beef.
- Lunchbox Hero: Between us, this is my go-to for school lunches or work dinners. Slice it up, wrap it in foil, and it stays warm (and delicious) for hours. My kids actually finish their lunches—rare for my house.
- Budget-Friendly Feast: Ground beef and cheese stretch far here, and the crust costs pennies. I’ve made this for potlucks, game days, and lazy Sundays, and no one ever asks what’s in it—just seconds. (Yes, even on a Tuesday night.)
Step-by-step instructions for beef and cheese pies recipe
Master these techniques and you'll achieve restaurant-quality flaky crusts with tender, savory fillings every time.
Prepare the Perfect Pie Crust
In a large bowl, combine the 4 cups all-purpose flour and 1 tsp salt, then cut in the 1.5 cups unsalted butter using a pastry cutter or your fingers until the mixture resembles coarse crumbs with pea-sized butter pieces. I press the butter pieces between my fingers to ensure even distribution—this creates the flaky layers we're after.
Gradually add the 0.5 cup ice water, 1 tablespoon at a time, mixing gently with a fork until the dough just comes together. The dough should hold when pressed but not be sticky. Divide the dough into 6 equal portions (about 8 ounces each), then flatten each into a 6-inch round. Wrap each in plastic and refrigerate for 30 minutes while you prepare the filling.
Cook the Savory Beef Filling
In a large skillet over medium-high heat, cook the 1.5 lb ground beef until it loses its raw color and begins to brown, breaking it apart with a wooden spoon. Drain all but 2 tablespoons of fat from the skillet—this fat carries incredible flavor. Add the 1 whole yellow onion and cook for 5 minutes until softened.
Stir in the 4 cloves minced garlic, 1 tbsp Worcestershire sauce, 1 tbsp Dijon mustard, 1 tsp dried thyme, 1 tsp salt, and 0.5 tsp ground black pepper. Cook for another 2 minutes until fragrant. Remove from heat and stir in the 2 cups shredded sharp cheddar cheese and 1 cup shredded mozzarella cheese until melted and smooth. The filling should be rich and well-seasoned—this is your flavor foundation.
Assemble the Pies
Preheat your oven to 375°F. Roll out one of the chilled dough rounds on a lightly floured surface to about 8 inches in diameter. Press it gently into a 6-inch pie pan, trimming any excess dough. Spoon about 1/6 of the beef filling into the crust, mounding it slightly in the center. The filling should be thick enough to hold its shape when baked.
Roll out another dough round and place it over the filling. Press the edges together firmly to seal, then use a fork to crimp the edges decoratively. Cut 4 small slits in the top crust to allow steam to escape. Repeat with remaining dough and filling. Brush the tops with the beaten 1 whole egg for a golden finish. Here's the thing—don't overwork the dough when sealing or you'll lose that flaky texture we worked so hard to create.
Bake to Golden Perfection
Place the pies on a parchment-lined baking sheet and bake for 30-35 minutes until the crusts are deep golden brown and the filling is bubbling through the slits. I like to rotate the pans halfway through baking for even color. The pies should feel firm to the touch and smell heavenly—this is your cue that they're done.
Remove from the oven and let cool for 10 minutes before serving. This resting period allows the filling to set slightly, making it easier to slice. Serve warm with a side of your favorite green vegetable or a simple salad. The contrast of the flaky, buttery crust with the rich, cheesy beef filling makes every bite satisfying. If you're short on time, you can also bake these in a muffin tin for individual-sized portions.
Pro Tips For Making Beef And Cheese Pie
- Brown the Beef First: I learned this the hard way—skipping browning means your pie filling will taste raw and mealy. Cook the ground beef until it’s deeply browned (not just pink), then drain most of the fat. That rich, caramelized flavor is what makes this pie sing.
- Chill the Dough: This isn’t the prettiest method, but it’s the tastiest: roll out your pie crust, wrap it tightly in plastic, and stash it in the fridge for at least 30 minutes before baking. Cold dough shrinks less, cracks less, and gives you that perfect flaky texture—no one will guess you didn’t buy it pre-made.
- Sweat the Onion Low: High heat. Seriously, crank it up to sear the onions at first, but once they soften, drop the heat to medium-low and let them cook for 8–10 minutes. This pulls out their natural sweetness without burning them into oblivion—trust me, your pie filling will taste like it’s been simmering for hours.
- Press Cheese Through a Sieve: Skip the chunky cheese mess by grating it first, then pressing it through a fine-mesh sieve into the filling. It melts faster, distributes evenly, and gives you that silky, stretchy texture instead of a chewy surprise in every bite. (Yes, even if you’re impatient like me.)
Storing and reheating your beef and cheese pie
Refrigerator Storage
Let your beef and cheese pies cool completely before storing them in an airtight container—I use glass Pyrex with tight-sealing lids. Place them in the fridge at 40°F or below where they’ll keep for 3-4 days.
The crust stays crispy, and the filling remains rich and flavorful. Honestly, I find they taste even better the second day as the flavors meld together. 🥧
Freezer Prep
For longer storage, freeze unbaked pies in their pans wrapped tightly with plastic wrap and aluminum foil. Label with the date—they’ll keep for 3 months without losing quality. When ready to bake, thaw overnight in the fridge, then bake as directed.
I’ve also had success freezing pre-baked pies (without filling) and adding filling later—just bake again at 350°F for 15 minutes.
Reheating Perfection
For the best results, reheat pies in a 375°F oven for 10-15 minutes until the crust is golden and the filling is bubbly. If using the microwave, cover with a damp paper towel and heat in 30-second intervals on 50% power until warmed through.
The oven method keeps the crust crispy, while the microwave works in a pinch. 💫
Make-Ahead Tips
Prep the filling ahead and store it in the fridge for 24 hours before baking—flavors develop beautifully. For crusts, roll them out and freeze on parchment paper for up to 1 month.
When ready to bake, thaw and proceed with assembly. I’ve even baked empty crusts, frozen them, then filled and baked again later. It’s a game-changer for busy days! ⏰
Portion Control
If you prefer individual servings, bake the pies in a muffin tin (use 1 tbsp filling per cup). Store them in the fridge for 3 days or freeze for 2 months.
Reheat in the oven at 350°F for 8-10 minutes for a crispy, golden result. The smaller size makes them perfect for lunches or potlucks—no one will guess they’re make-ahead! 🍽️
Nutrition facts
Frequently asked questions
Can I use a different type of cheese in this beef pie?
While sharp cheddar and mozzarella create the perfect balance, you can experiment with Gruyère for nutty depth or fontina for extra creaminess. For a smoky twist, try smoked gouda. Just ensure the cheese melts well—avoid hard cheeses like parmesan that won't blend smoothly into the filling.
What's the best way to make the crust extra flaky?
Cold butter is key! Keep your butter cubes frozen when cutting into the flour, and don't overwork the dough. Also, chill the rolled-out crusts for 15 minutes before baking. For extra flakiness, try the "laminate" method: fold the dough like a letter, chill, then unfold before rolling.
Can I make these pies ahead of time?
Yes! Assemble the pies (unbaked) and refrigerate for 24 hours before baking—this lets flavors meld. For make-ahead convenience, bake empty crusts, freeze them, then fill and bake again later. The crust stays crispy when reheated at 375°F for 10 minutes after adding filling.
Why did my pie crust turn soggy?
Soggy crusts usually mean steam got trapped. Always cut venting slits in the top crust, and avoid overfilling. Another trick: blind-bake the bottom crust for 5 minutes before adding filling. If using a muffin tin, bake at 350°F instead of higher temps to prevent moisture buildup.
How can I make these pies vegetarian?
Swap the beef for lentils or mushrooms—sauté 1.5 cups cooked lentils with the onions and garlic. Add 1 tbsp soy sauce for umami depth. For a meaty texture, use plant-based crumbles (like Beyond Meat). The cheese filling will still shine, creating a delicious vegetarian version!