
Appetizers
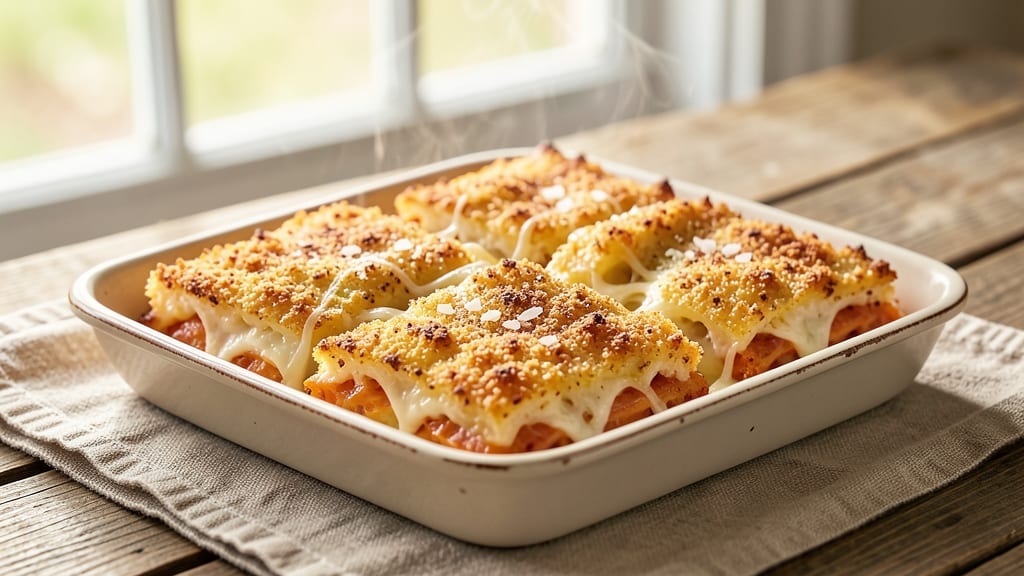
This baked cheese squares recipe delivers the perfect balance of crispy golden edges and a molten, gooey center that makes every bite irresistible. 🔥 The secret lies in the high-heat baking technique that creates that coveted texture contrast—crunchy on top, creamy inside.
I've perfected this recipe after years of experimenting with different cheeses and baking methods, and it never fails to impress.
The beauty of these cheese squares is their simplicity—just a handful of ingredients that come together in a single baking dish. You'll use a blend of sharp cheddar and cream cheese for that signature melt, while a buttery breadcrumb topping ensures maximum crispiness.
The recipe also includes optional variations like adding spinach or herbs for extra flavor depth, making it versatile for any occasion.
What you'll end up with is a batch of golden, bubbling cheese squares that are impossible to resist. The exterior stays delightfully crispy while the interior remains creamy and stretchy, creating the perfect textural contrast.
These make an excellent appetizer for parties, a satisfying snack, or even a hearty side dish for any meal.
Ready in just 25 minutes with minimal prep work, this recipe is perfect for home cooks looking to create restaurant-quality appetizers without the fuss. The best part? Leftovers reheat beautifully, so you can make a big batch and enjoy them all week long.
Ingredients for baked cheese squares
These golden squares combine crispy crunch with molten cheese perfection in just 25 minutes.
| Ingredient | Amount | Notes |
|---|---|---|
| Sharp Cheddar Cheese 🧀 | 2 cups | Freshly grated for best melt |
| Cream Cheese 🧈 | 8 oz | Full-fat for creaminess |
| All-Purpose Flour 🌾 | ½ cup | For crispy texture |
| Panko Breadcrumbs 🍞 | ¾ cup | Extra-crispy preferred |
| Unsalted Butter 🧈 | 4 tbsp | Melted for richness |
| Garlic Powder 🧄 | 1 tsp | For subtle flavor boost |
| Dried Parsley 🌿 | 1 tbsp | Optional for freshness |
| Fresh Spinach 🥬 | 1 cup | Chopped, optional variation |
| Egg 🥚 | 1 whole | For binding mixture |
| Milk 🥛 | 2 tbsp | For creamier texture |
| Salt 🧂 | ½ tsp | Adjust to taste |
| Black Pepper 🌶️ | ¼ tsp | Freshly cracked |
The cheese blend is everything—sharp cheddar for tang and full-fat cream cheese for melt. Grab Kraft sharp cheddar from any grocery store (it melts perfectly), and Philadelphia cream cheese if you want the creamiest texture. Trader Joe's has a great pre-grated cheddar that saves time, but freshly grated always wins. For the breadcrumbs, Panko is non-negotiable—it stays crispy while regular breadcrumbs turn soggy. Pro tip: toast your Panko in the oven for 5 minutes before using to crank up the crunch factor.
No sharp cheddar? Pepper jack works in a pinch, though it adds heat. Skip the spinach? No problem—just add an extra tbsp of dried parsley for color. Running low on milk? Heavy cream makes the mixture even richer, or use Greek yogurt for tang. The egg is crucial for binding, but if you're vegan, flax egg (1 tbsp ground flax + 3 tbsp water) does the trick. For extra flavor, toss in sun-dried tomatoes or jalapeños—just adjust the baking time if you add moisture-heavy ingredients.
These reheat like a dream—350°F for 5-7 minutes until bubbly. Store leftovers in an airtight container for up to 5 days, or freeze for 3 months by wrapping individually in parchment. For parties, bake them on a silpat mat instead of parchment for easy cutting. The secret to restaurant-quality results? Bake until the edges are deep golden—that’s when the magic happens. And trust me, the first bite is always the best.
Why You'll Love This Recipe
- One-Bowl Wonder: I swear by this recipe when I’m too tired to measure three separate ingredients. Just mix the sharp cheddar, cream cheese, and flour—no fancy techniques, just a fork and a bowl. The panko topping adds crunch without extra effort, and honestly? It’s the kind of dish that makes me feel like I did cook something impressive.
- Melty Magic: That perfect balance of sharp cheddar’s tang and cream cheese’s richness? It’s ridiculously satisfying. The butter in the panko topping makes every bite crispy on the outside, gooey inside—like a hug for your taste buds. (Yes, even on a Tuesday night.)
- Snack Attack Ready: Between us, these squares disappear fast. I make a big batch on Sunday, and they’re gone by Wednesday—grabbed straight from the fridge for lunches, packed in kids’ school bags, or devoured at 10 PM when I’m craving something salty. No reheating needed; they’re just as good cold.
- Pantry Staple Power: Sharp cheddar, cream cheese, flour, panko—you’re probably already stocked. No specialty items, no last-minute grocery runs. And if you bake a double batch? They freeze like a dream, so you’ve got an emergency snack or party appetizer covered without extra cost. My wallet and my freezer thank me.
Step-by-step instructions for baked cheese squares
Here's how to create the perfect balance of crispy golden crust and gooey melted cheese.
👨🍳 Step 1: Prepare the Cheese Mixture
In a large mixing bowl, combine the 2 cups Sharp Cheddar Cheese and 8 oz Cream Cheese. I always use freshly grated cheddar—it melts more smoothly than pre-shredded. Microwave this mixture in 20-second bursts until just melted, stirring between each burst to prevent overheating. You want it warm and gooey, not hot enough to cook the egg later.
While the cheese melts, whisk together the 1 whole Egg and 2 tbsp Milk in a separate bowl. This creates the perfect binder that keeps our squares together while adding that creamy texture. Once the cheese is melted, let it cool slightly—about 2 minutes—before adding the egg mixture. The cheese should be warm but not hot to the touch, or you'll scramble the egg.
🍳 Step 2: Combine Dry Ingredients
In the same bowl with the cheese mixture, stir in the 0.5 cup All-Purpose Flour, 0.75 cup Panko Breadcrumbs, 1 tsp Garlic Powder, 1 tbsp Dried Parsley, 0.5 tsp Salt, and 0.25 tsp Black Pepper. Mix until fully combined—you should see a thick, crumbly dough that holds together when pressed. If it feels too dry, add 1 tsp Milk at a time until it reaches a workable consistency.
For the spinach variation, fold in the 1 cup Fresh Spinach (chopped) at this stage. The spinach will wilt slightly, adding moisture and color to the mixture. I like to press the spinach into the dough to ensure even distribution—this prevents any leafy pockets that might burn during baking.
🔥 Step 3: Assemble and Bake
Preheat your oven to 375°F and grease a 9x9-inch baking dish with 2 tbsp Unsalted Butter, rubbing it all over the bottom and sides. This prevents sticking and gives that golden crust its extra richness. Press the cheese mixture firmly into the prepared dish, smoothing the top with a spatula. You want an even surface—about ½-inch thick—so it bakes uniformly.
Bake for 25-30 minutes until the edges are deep golden brown and the center still looks slightly underdone. Here's the thing—these squares need that crispy exterior, but they'll continue cooking slightly after you remove them from the oven. If you see the top browning too quickly, tent with foil for the last 5 minutes to prevent burning.
⏰ Step 4: Cool and Serve
Remove the baking dish from the oven and let the cheese squares cool for 10 minutes before cutting. This resting period allows the center to set slightly, making it easier to slice cleanly. The contrast between the crispy edges and melty center will be even more dramatic after cooling.
Use a sharp knife to cut into 9 equal squares (for 4 servings). Run a thin knife along the edges to ensure clean cuts. Serve warm with your favorite dipping sauce—marinara, ranch, or even a simple honey mustard. The crispy top will shatter slightly with each bite, revealing that gooey, cheesy heart underneath.
Pro Tips For Making Baked Cheese Squares
- MELT CHEESE SLOWLY: Mix the sharp cheddar and cream cheese over low heat—just until smooth, not bubbling. I learned this the hard way: overheating turns the cheese grainy, and you’ll end up with a sad, lumpy filling that won’t hold together.
- CHILL THE DOUGH: Press the cheese mixture into your pan, then pop it in the fridge for 15-20 minutes before baking. This keeps the squares from spreading like a melted mess, and the texture stays crisp instead of gummy.
- DON’T SKIP THE BUTTERED PAN: Grease that pan well—use softened butter, not oil, and spread it evenly. The panko crust needs something to cling to, or you’ll end up with a sad, crumbly bottom layer that falls apart when you cut.
- TOAST PANKO FIRST: Lightly brown the panko in a dry pan for 2-3 minutes before mixing it into the cheese. It adds a deeper, nuttier flavor and prevents the crust from turning soggy halfway through baking. (Yes, it’s an extra step, but it’s worth it.)
Flavor customization for this recipe
Classic Cheese Flavor
The signature flavor of these cheese squares comes from the sharp cheddar and cream cheese blend. I recommend using Kraft sharp cheddar for its reliable melt, but if you prefer something tangier, try Colby Jack or Pepper Jack instead.
The garlic powder and dried parsley add subtle depth without overpowering the cheesy goodness. For extra richness, add ½ tsp onion powder to the dry ingredients. 🧀
Herb-Infused Variation
For a fresh twist, mix in 2 tbsp chopped fresh chives or 1 tbsp dried dill with the parsley. The herbs brighten up the dish and pair beautifully with the creamy cheese. I also love adding 1 tbsp lemon zest for a zesty kick that cuts through the richness.
If using fresh herbs, reduce the dried parsley to 1 tsp to balance the flavors. 🌿
Spinach & Sun-Dried Tomato
This veggie-loaded version adds 1 cup chopped fresh spinach and ¼ cup chopped sun-dried tomatoes to the cheese mixture. The spinach wilts slightly, adding moisture and color, while the sun-dried tomatoes bring a tangy, umami depth.
For extra flavor, toss the sun-dried tomatoes in 1 tsp olive oil before adding them to the mix. This variation works especially well with mozzarella instead of cheddar for a lighter taste. 🥬
Spicy Kick Option
Crank up the heat by adding ½ tsp cayenne pepper or 1 tbsp hot sauce to the cheese mixture. For a smoky twist, stir in ½ tsp smoked paprika with the garlic powder.
If you love jalapeños, add ¼ cup diced pickled jalapeños—just be sure to drain them well first to avoid excess moisture. Serve with a cooling ranch or blue cheese dip to balance the heat. 🌶️
Bacon & Cheese Fusion
For a savory upgrade, fold in ½ cup cooked crumbled bacon with the dry ingredients. The smoky, salty bacon pairs perfectly with the creamy cheese and adds a satisfying crunch. I like to use thick-cut bacon cooked until crispy, then crumbled into small pieces.
Add 1 tsp liquid smoke for an extra smoky depth if you're feeling adventurous. This variation is a crowd-pleaser for brunch or game day. 🥓
Sweet & Savory Twist
Balance the richness with a touch of sweetness by adding 2 tbsp honey or 1 tbsp maple syrup to the cheese mixture. For a caramelized flavor, sprinkle 2 tbsp crushed pineapple (drained) into the dry ingredients.
This unexpected combo works surprisingly well, especially with Gouda cheese instead of cheddar. Serve with a spicy honey drizzle for a sweet-heat contrast. 🍯
Nutrition facts
Frequently asked questions
Can I make these cheese squares ahead of time?
These bake perfectly for parties or meal prep. Bake them up to 2 days ahead and store in an airtight container at room temperature. For longer storage, freeze individual squares wrapped in parchment paper for up to 3 months. Reheat frozen squares at 350°F for 5-7 minutes until bubbly and crispy again.
Why did my cheese squares turn out greasy instead of crispy?
Greasy squares usually mean the cheese mixture was too wet or the oven wasn't hot enough. First, ensure your cheese is fully melted but not overheated—microwave in 20-second bursts with stirring. Second, use Panko breadcrumbs (not regular) and toast them in the oven for 5 minutes before mixing. Finally, bake at 375°F until edges are deep golden brown.
What's the best way to cut these for serving?
Use a sharp, hot knife for clean cuts! Run a thin knife under hot water, wipe dry, then press firmly through the squares. For perfect portions, cut into 9 equal squares (for 4 servings) or 12 triangles for appetizer-sized bites. Let them cool 10 minutes first—they'll hold together better and give you that satisfying crunch.
Can I make these without eggs for a vegan version?
Yes! Replace the egg with a flax egg (1 tbsp ground flaxseed + 3 tbsp water) or silken tofu (¼ cup blended). For binding, add 1 extra tbsp flour to compensate. Vegan cheese works too—mix 1 cup vegan cheddar with ½ cup cashew cream for the best melt. Bake at 350°F for 25-30 minutes to prevent burning.
How do I prevent the top from burning before the center is cooked?
This is all about oven management! First, tent loosely with foil for the last 5-10 minutes of baking. Second, rotate the pan halfway through for even heat. Third, aim for deep golden edges with a slightly underdone center—they'll finish cooking as they cool. If your oven runs hot, reduce temp to 350°F and add 5 extra minutes** to the baking time.