
Breakfast & Brunch
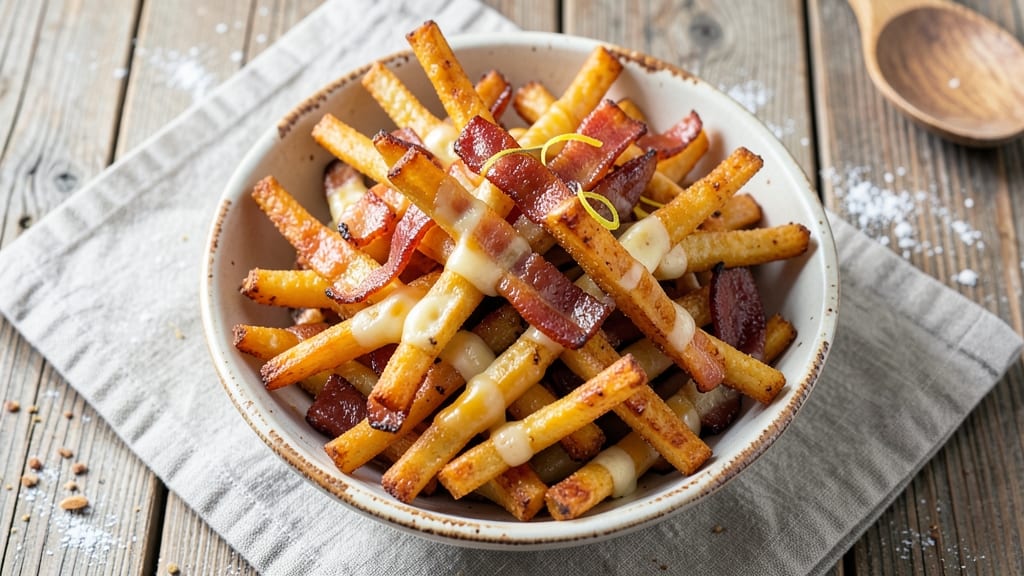
This bacon cheese straws recipe delivers the ultimate combination of crispy, smoky bacon and melty cheese in every bite—perfect for breakfast, brunch, or game day. The secret lies in layering crispy bacon with a rich, cheesy dough that bakes up golden and flaky, creating a texture that’s impossible to resist.
I’ve perfected this recipe over years of testing, ensuring every batch turns out with that satisfying crunch and gooey center.
The process starts with crispy bacon, which adds both flavor and texture to the straws. The dough, made with a blend of cheddar and mozzarella, creates a tender yet crispy base that holds up beautifully when baked.
What makes these straws special is how the bacon and cheese work together—not just as toppings, but as essential layers that transform a simple appetizer into something extraordinary. The result? A dish that’s as satisfying to make as it is to eat.
Once baked, these straws are golden on the outside with a perfectly melty, cheesy interior, all wrapped in that smoky bacon flavor. They’re ideal for serving with marinara for dipping, ranch for cooling the heat, or even as a standalone snack that disappears in minutes.
The best part? They’re easy to customize—add jalapeños for a kick, or swap the cheese for something bolder like pepper jack.
Whether you’re hosting a party, prepping for a game day, or just craving a crispy, cheesy bite, these bacon cheese straws are the answer. They’re foolproof, delicious, and guaranteed to impress. Let’s get started!
Ingredients for bacon cheese straws
Crispy bacon, melty cheese, and flaky dough—this combo is pure magic for any occasion.
| Ingredient | Amount | Notes |
|---|---|---|
| Thick-Cut Bacon 🥓 | 8 oz | Thick-cut for crispiness, cut into lardons |
| All-Purpose Flour 🌾 | 2 cups | Spooned and leveled, not scooped |
| Sharp Cheddar Cheese 🧀 | 1 cup | Shredded fine, block preferred |
| Mozzarella Cheese 🧀 | 1 cup | Part-skim or whole milk, shredded |
| Unsalted Butter 🧈 | ½ cup | Cold, cubed for dough |
| Large Egg 🥚 | 1 whole | Room temperature for blending |
| Granulated Sugar 🍚 | 1 tbsp | For dough sweetness |
| Baking Powder 🍞 | 1 tsp | Aluminum-free for best rise |
| Salt 🧂 | ½ tsp | Kosher or sea salt |
| Black Pepper 🌶️ | ¼ tsp | Freshly ground for flavor |
| Garlic Powder 🧄 | ½ tsp | For subtle depth |
| Vegetable Oil 🫒 | 1 tbsp | For greasing baking sheet |
The bacon is non-negotiable here—thick-cut makes all the difference for that perfect crunch. Costco or Trader Joe's usually have the best deals on thick-cut, and you want it to stay crispy, not soggy. For the cheese, sharp cheddar is key—it melts beautifully but still holds its bite. I always grab a block and shred it myself; pre-shredded gets clumpy. The mozzarella? Part-skim works fine, but whole milk gives that extra creaminess if you're feeling fancy. Pro tip: buy the cheese the day you bake—it stays fresher longer.
No thick-cut bacon? Regular bacon cut into small squares works, but it won’t be as crispy. Swap cheddar for pepper jack or gouda if you’re craving something bolder. The dough needs to be cold when you roll it out—chill the dough for 30 minutes before shaping. Short on time? Use refrigerated pie crust instead of making dough from scratch. The baking powder is crucial—aluminum-free ensures a lighter texture. And if you’re feeling adventurous, add a pinch of cayenne to the dough for a little kick!
These straws are best served fresh from the oven—crispy, warm, and gooey. But if you need to reheat, pop them in a 350°F oven for 5-7 minutes to restore that crunch. Store leftovers in an airtight container for 3-4 days, though they’ll lose some crispiness. For parties, bake them ahead and reheat before serving. They freeze beautifully too—up to 2 months—just reheat from frozen. Trust me, they’re even better the second time around!
Why You'll Love This Recipe
- No-Fuss Assembly: I swear by this recipe because it’s the kind of thing you can make while scrolling through your phone. Roll the dough, cut it into strips, bake—no fussing with fancy shaping or waiting for dough to rise. The thick-cut bacon just needs a quick crisp in the oven, and boom, you’re done.
- Crispy-Creamy Magic: That perfect balance of smoky bacon crunch and melty cheddar-mozzarella goo? It’s what makes these irresistible. The sharp cheddar adds a little bite, while the mozzarella stretches just enough to make every bite feel indulgent.
- Party in a Box: These straws are my go-to for game days, potlucks, or even a lazy Sunday brunch. They reheat beautifully, so I make a big batch and stash them in the freezer—no one ever leaves with leftovers, but I do.
- Budget-Friendly Indulgence: Honestly, this recipe costs me less than takeout, but feels like a treat. Thick-cut bacon and a block of cheddar stretch far, and the butter and flour are pantry staples. It’s comfort food that won’t break the bank.
Step-by-step instructions for bacon cheese straws
Here's how to create irresistible bacon cheese straws with that perfect smoky crunch and melty cheese center.
Cook the Bacon Lardons to Crispy Perfection
Preheat your oven to 400°F and line a baking sheet with parchment paper. Cut the 8 oz thick-cut bacon into ½-inch lardons—thick-cut bacon gives the best crispiness. Spread them out in a single layer on the prepared baking sheet, ensuring they don't overlap.
Bake for 12-15 minutes until the bacon is deep golden brown and crispy. Watch closely after 10 minutes—the edges should be crisping while the centers still look slightly underdone. Remove from the oven and let cool for 5 minutes before transferring to a paper towel-lined plate to drain excess fat. Pulse the cooled bacon in a food processor until you get small crumbles—this ensures even distribution in the dough.
Mix the Dough for Perfect Texture
In a large mixing bowl, combine the 2 cups all-purpose flour, 1 tbsp granulated sugar, 1 tsp baking powder, 0.5 tsp salt, 0.25 tsp black pepper, and 0.5 tsp garlic powder. Whisk until evenly distributed—you want no flour streaks remaining. This dry mix forms the foundation of our straws.
Cut the 0.5 cup unsalted butter into small cubes and add it to the dry ingredients. Use a pastry cutter or your fingers to work the butter into the flour until the mixture resembles coarse crumbs with pea-sized butter pieces. Add the 1 whole large egg and mix until the dough begins to come together. If it's too dry, add 1-2 teaspoons of ice water to help bind it.
Fold in Cheese and Bacon for Maximum Flavor
In a separate bowl, combine the 1 cup sharp cheddar cheese and 1 cup mozzarella cheese. Grate them if they aren't already shredded—finer cheese melts more smoothly. Add the grated cheeses and the cooled, pulsed bacon crumbles to the dough. Gently fold everything together using a silicone spatula until just combined. Overmixing develops gluten, which makes the straws tough instead of crispy.
Divide the dough into 4 equal portions and wrap each tightly in plastic wrap. Chill in the refrigerator for 30 minutes—this resting step is crucial. It firms up the dough, making it easier to roll and preventing the cheese from melting prematurely during shaping.
Roll and Cut the Straws for Even Baking
On a lightly floured surface, take one portion of chilled dough and roll it into a ¼-inch thick rectangle about 8x10 inches. Use a rolling pin to apply even pressure—this ensures consistent thickness throughout. If the dough cracks, gently press it back together without overworking it.
Using a sharp knife or pizza cutter, cut the dough rectangle into ¼-inch wide strips. Transfer the strips to a parchment-lined baking sheet, spacing them 1 inch apart to allow for expansion. Repeat with the remaining dough portions. Brush the tops lightly with water using a pastry brush—this helps them brown beautifully in the oven.
Bake to Golden Crispiness
Preheat your oven to 375°F with a rack positioned in the middle. Bake the straws for 12-15 minutes until they're deep golden brown and puffed slightly at the edges. Rotate the baking sheet halfway through for even browning—you want all sides to develop that beautiful crispy crust.
Remove from the oven and let cool on the baking sheet for 5 minutes before transferring to a wire rack. The straws will firm up as they cool, making them easier to handle. Serve warm for that perfect contrast of crispy exterior and gooey, melty cheese center. Store leftovers in an airtight container for up to 3 days or freeze for 1 month—they reheat beautifully in the oven.
Pro Tips For Making Bacon Cheese Straws
- CRANK THE HEAT HIGH: The dough for these straws needs a screaming-hot pan—think 375°F (190°C) or higher—so the cheese melts fast and the outside gets that perfect golden crust. I used to play it safe with medium heat, and my straws always ended up greasy and uneven. Trust me, the first batch might stick, but it’s worth the wait.
- CUT BACON THIN EARLY: Slice that thick-cut bacon paper-thin before cooking it—this is the thing that matters most for even cooking. I learned this the hard way when I tried to cut it after baking, and half the straws ended up undercooked while others burned. Do it raw, and thank your future self when every bite is perfectly crispy.
- CHILL THE DOUGH 30 MINUTES: Skip the urge to roll out cold dough straight from the fridge—let it sit in the fridge for 30 minutes first. This prevents the butter from melting too fast and turning your dough into a greasy mess. I was skeptical until I tried it, and now my straws hold their shape without falling apart.
- USE SHREDDED CHEESE, NOT BLOCK: Grate your own sharp cheddar and mozzarella instead of using pre-shredded—those anti-caking agents make the cheese clump and the straws gummy. I used to buy the bagged stuff for convenience, but my grandmother swore by this, and she was right: the texture is noticeably better when you do it fresh.
Perfect pairings for this recipe
Dipping Sauces
Marinara sauce is my go-to pairing—its tangy acidity cuts through the richness of the bacon and cheese beautifully. Heat 1 cup marinara with 1 tbsp olive oil and a pinch of red pepper flakes for a spicy kick.
Serve in a small bowl with a slotted spoon to drain excess sauce. For a creamy option, blend ½ cup ranch dressing with 2 tbsp sour cream and a splash of hot sauce for a smoky, tangy dip. 🍅
Breakfast Pairings
These straws make an incredible breakfast addition—serve them alongside fluffy scrambled eggs and crispy hash browns for a hearty morning meal. I like to arrange them on a platter with crumbled sausage and fresh fruit like berries or sliced peaches for a sweet-savory contrast.
A side of hot coffee or iced tea balances the richness perfectly.
Game Day Spread
For game day, I set up a DIY bacon cheese straw bar with multiple dipping options. Alongside marinara and ranch, offer spicy mayo (mix ½ cup mayo with 1 tbsp sriracha) and blue cheese dressing for a bold flavor.
Add pickled jalapeños and chopped scallions as garnishes. Serve with cold beer or sparkling cider for a refreshing contrast to the smoky, cheesy bites. 🏈
Sweet Contrast
Balance the savory flavors with sweet pairings like honey butter (mix 2 tbsp melted butter with 1 tbsp honey) or maple glaze (simmer 2 tbsp maple syrup with 1 tsp lemon juice).
Drizzle lightly over the straws or serve on the side for dipping. Fresh strawberries or banana slices make a delightful sweet accompaniment for a brunch spread.
Cheese Board Fusion
Elevate your presentation by serving the straws on a charcuterie board alongside aged cheddar cubes, prosciutto slices, and crusty bread. Add dark chocolate-covered bacon bits for a sweet-savory twist.
Pair with dry red wine like Cabernet Sauvignon or sparkling rosé to complement the rich, smoky flavors. This fusion makes for an unforgettable appetizer or snack. 🧀
Nutrition facts
Frequently asked questions
Can I make these straws without baking?
For a crispier, frying method, heat 1 inch of oil in a deep skillet to 350°F. Fry the straws in batches for 2-3 minutes until golden brown, turning occasionally. Drain on paper towels. This method works especially well if you prefer extra-crispy results. Just be sure to keep an eye on them—they can burn quickly!
How do I store leftover bacon cheese straws?
Store leftovers in an airtight container at room temperature for 1-2 days for best texture. For longer storage, freeze them for up to 1 month. To reheat, place frozen straws on a baking sheet and warm in a 350°F oven for 5-7 minutes until crispy again. Avoid microwaving—they'll get soggy!
Why did my straws turn out dense instead of crispy?
Overmixing the dough or skipping the 30-minute chill are the most common culprits. The chill time helps develop flavor and prevents the cheese from melting too soon. Also, ensure your baking sheet is well-greased or use parchment paper—straws sticking to the pan can make them flat. For extra crispiness, brush with egg wash before baking.
Can I add other proteins or veggies?
Yes! Try adding crumbled sausage or diced ham to the dough for extra flavor. For veggies, finely chopped jalapeños or green onions work well—they add a nice texture contrast. Just be mindful not to overload the dough, or the straws may become too dense. Start with ½ cup of any additional ingredient.
Are these straws kid-friendly?
Most kids love them! The crispy texture and melty cheese are always a hit. For picky eaters, you can make a cheese-only version by omitting the bacon crumbles. Serve with a mild dip like ranch or ketchup to make them even more approachable. Just be aware that small pieces can be a choking hazard for young children.