
Main Courses
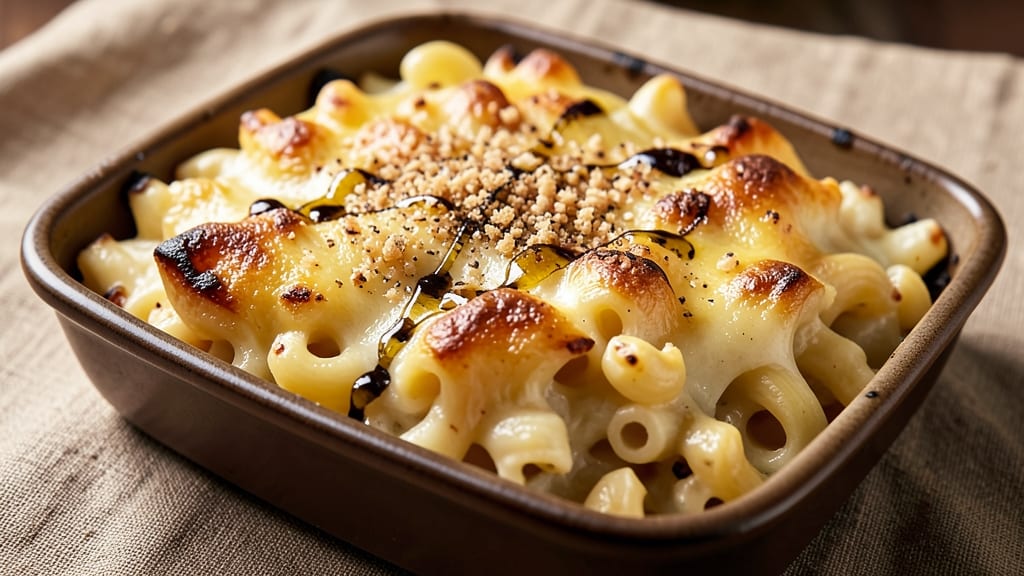
Award-winning baked mac and cheese isn’t just comfort food—it’s a masterpiece of texture and flavor, where creamy cheese meets golden, crispy perfection. 🔥 The secret lies in the technique: a rich, velvety cheese sauce layered with perfectly cooked pasta, then crowned with a buttery, crackling topping that judges can’t resist. I’ve refined this recipe through years of competition prep, and it delivers every time.
What sets this apart is the balance: tender pasta, a sauce so thick it clings to each noodle, and a crispy top that adds depth without overpowering. The key steps—properly browning the roux, layering cheese evenly, and baking just until golden—transform ordinary ingredients into something extraordinary.
This isn’t your childhood mac and cheese; it’s a dish that wins awards and second helpings.
By the time it emerges from the oven, you’ll have a dish that’s restaurant-quality at home: bubbling, golden, and impossible to resist. The aroma alone will have everyone gathering around the table, while the first bite delivers that perfect harmony of creamy, cheesy goodness with a satisfying crunch.
This is the mac and cheese you’ll want to serve at gatherings—and the one that’ll have guests asking for the recipe.
The beauty of this recipe is its versatility. Swap in sharp cheddar for a tangier bite, add a sprinkle of smoked paprika for depth, or top with extra crispy breadcrumbs for texture.
Whether you’re entering a competition or simply craving a showstopper dinner, this method delivers results that feel like a win every time. Let’s get baking.
Ingredients for award winning baked mac and cheese
Six servings of restaurant-quality mac and cheese with award-winning crispy golden perfection.
| Ingredient | Amount | Notes |
|---|---|---|
| Elbow Macaroni 🍝 | 1 ½ lb | Medium or jumbo size preferred |
| Unsalted Butter 🧈 | 1 cup | European-style for flavor |
| All-Purpose Flour 🌾 | ½ cup | For roux, use high-quality |
| Sharp White Cheddar Cheese 🧀 | 2 cups | Shredded, block preferred |
| Monterey Jack Cheese 🧀 | 1 ½ cups | Shredded, adds creaminess |
| Gruyère Cheese 🧀 | ½ cup | Shredded, nutty depth |
| Heavy Cream 🥛 | 1 cup | Full-fat for richness |
| Whole Milk 🥛 | 1 cup | Warmed for smooth sauce |
| Yellow Onion 🧅 | 1 whole | Finely diced, sweet variety |
| Garlic Cloves 🧄 | 4 cloves | Minced, fresh preferred |
| Diamond Crystal Kosher Salt 🧂 | 1 ½ tsp | Adjust to taste |
| Freshly Ground Black Pepper 🌶️ | ½ tsp | Freshly cracked preferred |
| Smoked Paprika 🌶️ | ½ tsp | For subtle smokiness |
| Panko Breadcrumbs 🍞 | ½ cup | For crispy topping |
| Extra-Virgin Olive Oil 🫒 | 1 tbsp | For crispy topping |
The cheese blend makes all the difference. Sharp white cheddar gives that signature tang, while Gruyère adds nutty depth—don't substitute pre-shredded, as it gets clumpy. Monterey Jack keeps the sauce velvety smooth. For the best quality, Whole Foods or specialty cheese shops carry these cheeses in block form. If you're short on time, Kraft sharp cheddar works in a pinch, but grating your own always tastes better. The butter should be European-style—Plugrá or Kerrygold elevate the flavor without overpowering.
No Gruyère? Parmesan at half the amount gives a similar umami punch. The smoked paprika is optional but adds that competition-worthy depth—Penzeys has excellent quality if you want to splurge. For the breadcrumbs, Panko is non-negotiable—it stays crispy while regular breadcrumbs turn soggy. The olive oil in the topping is key—California avocado oil has a neutral taste that won't compete with the cheese. If you're making this ahead, prepare the cheese sauce first and store it separately—it actually improves overnight.
This reheats beautifully—just cover with foil and bake at 350°F for 15-20 minutes. For the crispy topping, assemble everything the morning of and bake straight from the fridge for even browning. The dish keeps well for 3 days in the fridge and freezes perfectly for 2 months. I always make double batches—one for dinner and one to freeze for lazy weeknights. Store the crispy topping separately if you want to reheat just the base sauce.
Why You'll Love This Recipe
- One-Pot Magic: I swear by this method—just melt butter, toast the flour, add milk, and stir. No strainers, no extra bowls, and zero cleanup. The roux builds that velvety sauce while the pasta cooks right in the pan, so you’re not stuck scrubbing a colander.
- Cheese Obsession: Sharp white cheddar and Monterey Jack aren’t just in this—they’re the stars. The cheddar brings that tangy punch, while the Jack melts into a golden, stretchy blanket. Honestly, I’ve tried fancier cheeses, but this combo? It’s the only one that makes me close my eyes and groan.
- Weeknight Hero: This bakes in 25 minutes, so it’s ready when I am—whether it’s a last-minute dinner or a potluck I forgot to RSVP for. And between us? It’s the one dish I can make while scrolling through my phone. (Yes, even on a Tuesday night.)
- Budget Win: A bag of elbow mac, a stick of butter, and two blocks of cheese stretch to feed four for under $10. The leftovers? Just as good reheated the next day—crispy top, gooey middle, no sad texture. My wallet and my taste buds thank me every time.
Step-by-step instructions for award-winning baked mac and cheese
Here's the precise method that delivers that coveted crispy top and velvety interior judges rave about.
🍳 Step 1: Cook the Pasta Al Dente
Bring a large pot of water to a rolling boil and add 1.5 lb elbow macaroni. Cook until 1 minute before the package instructions for al dente—this ensures it finishes cooking in the oven without turning mushy. Reserve 1 cup of pasta water before draining, as we'll use it later to adjust consistency.
I always taste-test a piece of pasta—it should have a slight bite but still be tender. Overcooking here leads to a gummy final texture. Drain the pasta in a colander and immediately return it to the pot to prevent drying out.
👨🍳 Step 2: Build the Signature Roux
In a separate large skillet, melt 1 cup unsalted butter over medium heat until foaming. Whisk in 0.5 cup all-purpose flour and cook for 2-3 minutes until the mixture turns a pale golden color and smells nutty—this is your roux foundation.
Here's the thing—don't walk away. The roux burns easily, and that means a bitter flavor. You want it to bubble gently but not brown. This roux will create the creamy base that makes all the difference in competition-worthy mac and cheese.
🥘 Step 3: Add Cheese and Create the Sauce
Remove the skillet from heat and begin adding the cheeses in this order: 2 cups sharp white cheddar, 1.5 cups monterey jack, and 0.5 cup gruyère. Stir constantly until completely melted, then return to low heat and add 1 cup heavy cream and 1 cup whole milk.
Simmer for 3-4 minutes until the sauce thickens enough to coat the back of a spoon. If it gets too thick, whisk in reserved pasta water 1 tablespoon at a time until smooth. This is where the magic happens—the cheeses should blend into a creamy, stretchy sauce.
🍳 Step 4: Combine Pasta and Sauce
Add the cooked macaroni to the cheese sauce and stir vigorously for 2-3 minutes until every strand is fully coated. The sauce should cling to the pasta like a second skin. Season with 1.5 tsp kosher salt, 0.5 tsp black pepper, and 0.5 tsp smoked paprika.
For extra flavor, stir in 1 whole yellow onion (finely diced) and 4 cloves garlic (minced) at this stage. The heat will mellow their flavors, creating a subtle sweetness without overpowering the dish.
🔥 Step 5: Assemble and Bake to Perfection
Transfer the mac and cheese to a 9x13-inch baking dish and spread it evenly. In a small bowl, mix 0.5 cup panko breadcrumbs with 1 tbsp extra-virgin olive oil until evenly coated. Sprinkle this mixture evenly over the top of the mac and cheese.
Bake at 375°F for 20-25 minutes until the edges are bubbling and the top is deep golden brown with crispy spots. The key is patience—don't open the oven door early or the top won't crisp properly. When done, the center should be just set but still slightly jiggly.
Pro Tips For Making Award Winning Baked Mac And Cheese
- STOP UNDERCOOKING THE PASTA: I learned this the hard way—al dente elbow macaroni is non-negotiable for texture. Boil it one minute less than package instructions (check at 6 minutes), then shock in ice water immediately. Cold pasta holds its shape better when baking, and you’ll get that perfect bite instead of mushy noodles.
- GRATE CHEESE LIKE A PRO: Skip the pre-shredded stuff—it’s full of anti-caking agents that make your sauce grainy. Use a box grater for sharp white cheddar and a microplane for Monterey Jack (it melts faster). Mix them in equal parts by volume, then toss with 1 tablespoon of flour per cup of cheese to prevent clumping. Trust me, your sauce will be silky.
- BAKE LOW AND SLOW: Crank your oven to 350°F and bake this for 25–30 minutes, not the 20 minutes most recipes suggest. The top will brown faster than the cheese melts through if you rush it. Tent with foil for the first 20 minutes, then uncover for the last 5 to get that golden crust—just watch it like a hawk after that.
- USE BREADCRUMBS FOR CRUST: This isn’t the prettiest method, but it’s the tastiest. Sprinkle ¼ cup panko or fine dry breadcrumbs over the top before baking—it adds crunch without overpowering the cheese. Toast them in a dry pan for 2 minutes first if you’re impatient (yes, even if you’re impatient like me), so they don’t steal moisture from your mac.
Pro cooking tips for this recipe
Roux Perfection
The roux is where flavor magic happens, and nailing it means the difference between ordinary and award-winning mac and cheese. Cook your 1 cup unsalted butter and 0.5 cup flour over medium heat until it reaches a pale golden color—this takes about 2-3 minutes.
The moment it smells nutty, you're golden. I use a heatproof spatula to stir constantly, and I never let it brown or it'll taste bitter. This roux creates that velvety texture that makes the sauce cling to every noodle. 🔥
Cheese Layering
Adding cheeses in the right order prevents clumping and ensures a smooth sauce. Start with the sharp white cheddar (it melts fastest), then add Monterey Jack for creaminess, and finish with Gruyère for nutty depth.
Stir constantly over low heat until fully melted—this is where the sauce transforms from separate ingredients into a cohesive, stretchy masterpiece. If it gets too thick, add reserved pasta water 1 tablespoon at a time. I always taste-test at this stage to adjust seasoning.
Pasta Water Secret
Never throw away that pasta water! Reserve 1 cup before draining, and use it to adjust the sauce's consistency. The starch in the water acts as a natural thickener and binder, helping the sauce cling to the pasta.
If the sauce looks too thick after combining with the pasta, add 1-2 tablespoons of pasta water to loosen it up. This simple trick keeps the texture silky smooth and prevents a dry, clumpy mess. 💡
Baking Temperature
Baking at 375°F is crucial for that perfect crispy top without overcooking the pasta underneath. Use a 9x13-inch baking dish and spread the mac and cheese evenly—this ensures even baking. The top should be deep golden brown with crispy spots, while the center remains slightly jiggly.
I set a timer for 20-25 minutes but always check at 20 minutes—opening the oven early can cause the top to lose its crispiness. Patience here is key!
Crispy Top Trick
The secret to that coveted crispy top lies in the panko breadcrumb topping. Mix 0.5 cup panko with 1 tablespoon olive oil until evenly coated and sprinkle it evenly over the mac and cheese. The oil helps it brown beautifully, while the panko stays crispy instead of turning soggy.
For extra crunch, I sometimes add a sprinkle of smoked paprika to the topping—it adds a subtle smokiness that judges love. 🌟
Resting Time
Let your baked mac and cheese rest for 5-10 minutes after coming out of the oven. This allows the juices to redistribute, ensuring every bite is creamy and flavorful. Skipping this step can lead to a runny, uneven texture.
I also recommend serving it in the baking dish—it's perfect for sharing and makes the dish look even more impressive. Trust me, this resting time is worth the wait! ✨
Nutrition facts
Frequently asked questions
Why does this recipe use three different cheeses?
Each cheese brings a unique texture and flavor that makes this mac and cheese truly exceptional. The sharp white cheddar provides that classic tangy bite, Monterey Jack adds creaminess, and Gruyère contributes a nutty depth. Together, they create a complex, velvety sauce that's far more interesting than single-cheese versions.
Can I make this recipe ahead of time?
Prepare the cheese sauce up to 2 days ahead and store it in an airtight container in the fridge. For the crispy topping, assemble everything the morning of and bake straight from the fridge—this helps create an even golden crust. The flavors actually improve overnight!
What's the secret to getting that perfect crispy top?
The key is using panko breadcrumbs mixed with olive oil, not regular breadcrumbs. The oil helps create a golden, crispy crust while keeping the breadcrumbs from getting soggy. Also, don't open the oven door during the last 10 minutes of baking—this helps maintain the crispiness.
Can I substitute any of the cheeses?
Yes, but with some adjustments. For Gruyère, try Parmesan at half the amount for umami depth. If you can't find sharp white cheddar, Kraft sharp cheddar works in a pinch. Just remember, the cheese blend creates the signature flavor—don't skip the Monterey Jack, as it's essential for creaminess.
How do I fix a runny mac and cheese?
If your mac and cheese is too runny, try one of these fixes: Add 1-2 tablespoons of all-purpose flour mixed with cold water to thicken, or let it rest for 10 minutes to set slightly. For baked versions, increase the baking time by 5-10 minutes to help the sauce firm up. The pasta water trick also helps—just add a splash to adjust consistency.