
Snacks
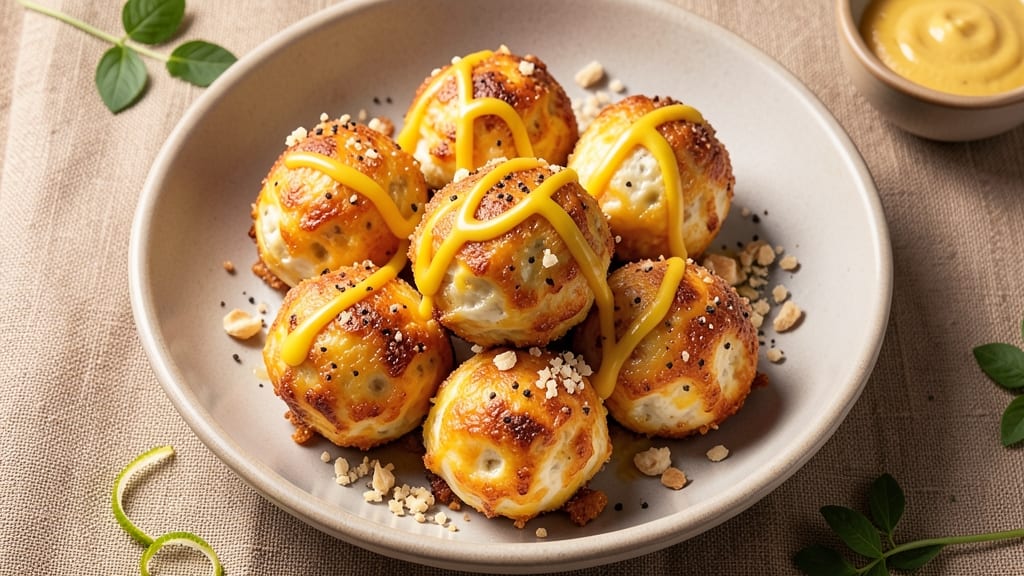
This American cheese balls recipe delivers the ultimate party snack—crispy golden edges, gooey melted cheese centers, and a perfect balance of tangy cheddar and creamy texture. The secret lies in the right cheese blend and a few simple techniques that ensure every bite is addictive.
I’ve perfected this version over years of game days and holiday gatherings, where these disappear faster than you can say "second round."
The magic happens when sharp cheddar and cream cheese combine with a touch of mustard for depth, then bake until golden and crisp. No frying required—just a hot oven and 20 minutes of hands-off time.
The result? A snack that’s impossible to resist, with that satisfying crunch giving way to melty, cheesy goodness. This is the kind of recipe that transforms simple ingredients into something extraordinary.
What makes these cheese balls truly special is their versatility. Serve them warm with marinara for dipping, or pair with spicy ranch for a kick. They’re perfect for parties, game day, or even a quick weeknight snack when hunger strikes.
The best part? You can customize them with jalapeños, bacon, or even a sprinkle of paprika for extra flavor.
Ready in just 20 minutes, this recipe is foolproof and delivers crispy results every time. Whether you’re feeding a crowd or craving a cheesy treat for yourself, these cheese balls won’t disappoint. Let’s get started!
Ingredients for american cheese balls
These 12 ingredients transform into the ultimate crowd-pleasing cheese balls everyone will devour.
| Ingredient | Amount | Notes |
|---|---|---|
| Sharp Cheddar Cheese 🧀 | 8 oz | Shredded, 2-year aged preferred |
| Cream Cheese 🧀 | 8 oz | Full-fat, room temperature |
| Yellow Mustard 🥬 | 1 tbsp | Dijon preferred for tang |
| All-Purpose Flour 🌾 | ½ cup | For binding, sifted |
| Garlic Powder 🧄 | ½ tsp | Freshly ground preferred |
| Ground Black Pepper 🌶️ | ½ tsp | Freshly cracked |
| Paprika 🌶️ | ½ tsp | Smoked for extra flavor |
| Baking Powder 🧂 | ½ tsp | For crispiness |
| Unsalted Butter 🧈 | 2 tbsp | Melted, for coating |
| Marinara Sauce 🍅 | 1 ½ cups | For dipping, optional |
| Spicy Ranch Dressing 🥛 | 1 cup | For dipping, optional |
| Panko Breadcrumbs 🍞 | ½ cup | For extra crunch |
The cheddar is non-negotiable—sharp, aged varieties like Cabot or Tillamook make all the difference. Cream cheese should be full-fat (none of that low-fat nonsense) and room temperature for smooth mixing. Grab Dijon mustard from the fancy jar at Whole Foods or Trader Joe’s—it’s worth the extra tang. For the flour, King Arthur is my go-to, but any all-purpose brand works. The garlic powder and paprika? Penzeys or the bulk bins at Sprouts have the freshest ground spices. Pro tip: Toast the spices in a dry pan for 30 seconds before mixing—they’ll sing with flavor!
No sharp cheddar? Pepper Jack adds heat, or Colby Jack for a milder bite. Ran out of Dijon? Yellow mustard works, but add a pinch of sugar to balance. Panko breadcrumbs are a must for that perfect crunch, but crushed cornflakes in a pinch work too. The marinara and ranch are optional but essential for serving—Rao’s marinara and Hidden Valley ranch are my game-day staples. Want to customize? Toss in diced jalapeños or crumbled bacon before baking. For extra crispiness, mix 1 tbsp cornstarch into the breadcrumbs—trust me, it’s a game-changer!
These cheese balls are best served fresh but reheat beautifully in the oven at 350°F for 5-10 minutes. Store leftovers in an airtight container for up to 5 days in the fridge, or freeze for 3 months—pop them in the oven straight from frozen for crispy results. Portion into muffin tins before baking to make freezing and reheating a breeze. The marinara and ranch? Keep them in separate jars in the fridge for up to 2 weeks—no need to refrigerate the cheese balls until serving!
Why You'll Love This Recipe
- No-Fuss Assembly: I swear, this is the kind of recipe where you can measure while watching TV. Just mix the sharp cheddar, cream cheese, and mustard with your hands—no food processor, no stress—then fold in flour and garlic powder until it holds together. The dough comes together faster than you can say "game day."
- That Crispy-Creamy Magic: Between us, the mustard gives these a tangy kick that cuts through the richness of the cheddar, while the garlic powder adds warmth. Roll them into balls, bake until golden, and you’ve got that perfect crispy shell with a gooey, melty center—like a hug in bite form.
- Game Day MVP: Honestly, these disappear at parties, tailgates, or even as a snack while grading papers. They’re hearty enough for a crowd but simple enough that no one will ask how long you’ve been cooking. (Spoiler: Not long.)
- Budget Snack Hero: A bag of sharp cheddar and a block of cream cheese stretch farther than you’d think. I’ve made a dozen of these for under $5, and they’ve fed my kids, my book club, and my dog (okay, maybe not the dog). Plus, they reheat beautifully—so leftovers are just a future meal waiting to happen.
Step-by-step instructions for American cheese balls
Here's how to make these irresistibly crispy, gooey cheese balls that disappear faster than you can say "dip."
Mix the Cheese and Seasonings
In a large mixing bowl, combine the 8 oz sharp cheddar cheese and 8 oz cream cheese. I like to use my hands for this part—it helps break up any lumps in the cream cheese and creates a smoother texture. Microwave the cheeses for 10-15 seconds if they're too firm to mix easily, but don't overdo it or they'll melt completely.
Add the 1 tbsp yellow mustard, 0.5 tsp garlic powder, 0.5 tsp ground black pepper, 0.5 tsp paprika, and 0.5 tsp baking powder to the cheese mixture. The baking powder might seem odd, but it creates little air pockets that make the cheese balls extra crispy. Mix everything together until you have a smooth, uniform dough that holds together when pressed.
Here's the thing—this mixture should be cool enough to handle but warm enough to bind well. If it's too sticky, chill it for 10 minutes in the fridge before proceeding. The dough should be pliable but not greasy; if it's too soft, sprinkle in a little more of the 0.5 cup all-purpose flour until it comes together nicely.
Shape and Chill the Cheese Balls
Using your hands, roll the dough into 1-inch balls—about 24 total based on our serving size. I find it easiest to wet my hands slightly with water to prevent sticking. Place the balls on a parchment-lined baking sheet and refrigerate for 20 minutes. This chilling step is crucial; it firms up the cheese so it holds its shape in the oven.
While the balls are chilling, preheat your oven to 375°F. This temperature gives you that perfect balance of crispy exterior and gooey interior. Don't skip the preheating—cold oven = soggy cheese balls. I like to set a timer so I don't forget this important step while the dough is chilling.
Real talk: if your kitchen gets warm, the cheese might soften too much during chilling. In that case, pop the baking sheet in the freezer for 5 minutes before shaping to keep everything firm. The goal is cheese balls that hold together when you pick them up, but still soft enough to melt slightly in your mouth.
Create the Crispy Coating
In a shallow bowl, mix the 0.5 cup panko breadcrumbs with the 2 tbsp melted unsalted butter. The butter helps the breadcrumbs stick to the cheese balls and adds an extra layer of richness. Once the cheese balls have chilled, roll each one in the panko mixture until fully coated. Press gently to ensure the crumbs adhere well—this is what creates that addictive crunch.
Transfer the coated cheese balls back to the baking sheet, spacing them about 1 inch apart. This gives them room to expand and crisp up properly. If you're feeling fancy, you can arrange them in a circular pattern for a pretty presentation, but honestly, they taste just as good when they're just piled on the tray.
Don't walk away after coating—proceed directly to baking while the panko is still sticky. The longer you wait, the more the breadcrumbs will dry out and lose their ability to create that perfect crispy shell.
Bake to Golden Perfection
Bake the cheese balls in the preheated 375°F oven for 12-15 minutes, flipping them halfway through with a spatula. You're looking for deep golden brown color on all sides—they should be crispy on the outside but still soft and gooey inside. The exact time depends on your oven, so start checking at the 12-minute mark.
Here's the moment that matters: the cheese balls are done when they're golden brown and pull away slightly from the baking sheet when you lift a corner. If you take them out too soon, they'll be pale and doughy; if you leave them too long, they'll turn hard and dry. That perfect window is crucial for getting the right texture.
Let the cheese balls cool on the baking sheet for 5 minutes before serving. This brief resting period helps them set slightly, making them easier to handle without falling apart. Serve immediately with the 1.5 cups marinara sauce and 1 cup spicy ranch dressing for dipping—trust me, the contrast of cool dip and warm cheese balls is pure magic.
Pro Tips For Making American Cheese Balls
- MEASURE BY WEIGHT: Sharp cheddar and cream cheese vary wildly in moisture—eyeballing leads to gummy or dry balls. Use a kitchen scale for the cheeses (8 oz each is a solid starting point) instead of cups. I learned this the hard way when my first batch turned out like rubber.
- CUT CHEESE SMALL: Slice the sharp cheddar into ½-inch cubes instead of shredding. The cubes melt more evenly and don’t leave stringy bits in your dough. Yes, it takes 2 minutes extra, but the texture is noticeably smoother.
- COOK LOW AND SLOW: Skip the high heat—it burns the outside before the center sets. Simmer on medium-low (around 325°F) for 15-20 minutes, stirring occasionally, until the bottom browns just enough to hold shape. Rushing this step makes your cheese balls fall apart when you try to roll them.
- ADD MUSTARD LAST: Mix the yellow mustard into the flour after combining the cheeses and butter. This keeps the sharp tang from overpowering the melt—it’ll distribute evenly when you fold it in at the end. I was skeptical until I tried it; the flavor balance is way cleaner.
Serving suggestions for leftovers
Game Day Essentials
These cheese balls are the ultimate crowd-pleaser for tailgating or game day—set up a DIY dip station with small bowls of marinara and spicy ranch for easy grabbing.
I like to arrange them on a wooden board with toothpicks for easy handling, and add pickled jalapeños on the side for those who want extra heat. For a football theme, use red and white striped paper to line your serving tray. 🏈
Party Platter Presentation
For parties, arrange the cheese balls on a large platter surrounded by baby carrots, celery sticks, and crackers for a balanced appetizer spread. Sprinkle crushed red pepper flakes or smoked paprika over the top for a pop of color.
If you want to go fancy, drizzle melted white chocolate in a zigzag pattern before serving—it adds a sweet contrast that pairs surprisingly well with the savory cheese. 🎉
Kid-Friendly Serving
For little ones, serve the cheese balls on a colorful platter with fruit skewers (like grapes and melon) to balance out the richness. Cut them into bite-sized pieces for easier handling, and offer mild ranch instead of spicy dipping sauces.
Kids love the fun shapes—roll some into mini footballs or stars using a cookie cutter before baking. 🧒
Reheating for Leftovers
Store leftovers in an airtight container and reheat in the oven at 350°F for 5-10 minutes to restore crispiness. For a quick fix, microwave for 20-30 seconds (covered with a damp paper towel) to soften slightly—though they won’t be as crispy as fresh-baked.
I like to portion them into muffin tins before baking for easy reheating later. ⏰
Gourmet Upgrades
Elevate your serving game with truffle oil drizzle or balsamic glaze for a sophisticated touch. Add microgreens or edible flowers for garnish, or serve with whipped honey butter for a sweet-savory combo. For a smoky twist, brush the baked cheese balls with garlic-infused olive oil before serving. 💫
Freezer-Friendly Party Prep
Make a double batch and freeze half for later—pop them straight from the freezer into a 375°F oven for 15-18 minutes (no thawing needed!). Store in ziplock bags with parchment paper between layers to prevent sticking.
Label with the date so you can keep track—these freeze beautifully for up to 3 months. Perfect for last-minute parties! ❄️
Nutrition facts
Frequently asked questions
Can I make these cheese balls without cream cheese?
You can substitute cream cheese with an equal amount of full-fat ricotta cheese or mascarpone, but the texture will be slightly denser. For a lighter option, use 2 oz less cheddar and add 1/4 cup grated Parmesan to compensate for flavor. The mustard is key—don't skip it, as it helps bind the mixture without cream cheese.
Why did my cheese balls turn out greasy instead of crispy?
Greasy cheese balls usually happen when the dough is too warm before baking or the butter coating isn't fully absorbed. First, ensure your cheese mixture is chilled for the full 20 minutes before coating. Second, pat the panko mixture gently but firmly onto each ball—don't just roll them. Bake at 375°F for 12-15 minutes without opening the oven door to trap moisture.
How can I make these cheese balls spicier?
Add 1/2 tsp cayenne pepper or 1 tbsp hot sauce to the dough for heat. For extra kick, mix 1/4 cup diced jalapeños or 1/2 tsp chipotle powder into the cheese before shaping. Serve with spicy mayo or sriracha aioli for dipping. Pro tip: Toast the spices in a dry pan for 30 seconds first to deepen the flavor!
Can I air fry these cheese balls instead of baking?
Preheat your air fryer to 375°F and cook in batches for 8-10 minutes, shaking the basket halfway. For extra crispiness, spray the balls lightly with oil before air frying. Watch closely—they cook faster than in the oven. Air frying gives you a slightly lighter texture while keeping that perfect gooey center.
What's the best way to store cheese balls for parties?
Keep them warm in a 200°F oven on a wire rack for up to 2 hours before serving. For longer storage, place in an airtight container with parchment paper between layers to prevent sticking. Reheat individual balls in the oven for 5-7 minutes at 350°F to restore crispiness. Freeze extras in a single layer on a tray, then transfer to a bag for up to 3 months.